Small Gravity Forms plugin to resend notifications

Updated Tue 10 May 2016

Gravity Forms doesn’t return or record success or failure of emails, so you may find yourself having to resend them if there was a problem.

It is already possible to trigger notifications for form entries again via the WordPress admin interface, but it requires a lot of clicking should there be very many of them.  Also, although the Directory Columns option allows you to customise the fields displayed, the entry submission date/timestamp is not available here.

Here’s a very quick plugin which uses WP-CLI and the GFAPI to show you a whole batch of entries for a form and filter by start/end date (or date and time).

You can also view a summary of the main notification settings (from/to/reply-to addresses, subject line) for all (or selected) forms.

Full syntax/help is available with:

wp help gftuil renotify
wp help gfutil notifications

Install via GitHub

OS X El Capitan upgrade tips

(updated Sun 3 April 2016)

Yesterday I upgraded my primary computer (a 2012 Mac Mini) to El Capitan (OS X 10.11).

It’s normal for me to wait 6 months or so for the .3 or .4 OS X release, to allow Apple to fix hardware, networking, performance problems or random bugs and – crucially – for other developers to do the same with their applications (by no means everyone is actively testing software on the beta versions.) I’d recommend this to others.

Installation notes/tips:

  • Backup first (obviously.)
  • I recovered around 40GB of free space after installation (and 17GB on a Macbook Air upgraded soon after.)
  • performance is generally snappier (the CPU graph in Activity Monitor looks flatter when the system is idle, also considerable improvements when previewing files – not just PDFs but video as well)
  • performance will degrade considerably immediately after installation (less so on an SSD, but the Mac Mini’s HDD + Fusion Drive suffered a lot) as Spotlight reindexes everything (you’ll see sustained high disk IO and high CPU from md5 and associated processes.) If there is more than one user of the computer, this will happen the first time each user logs in, as each has a separate Spotlight database.  If you use Dropbox, temporarily quitting that will help it complete faster.  Keep Activity Monitor open and once indexing has finished, disk IO will return to zero.
  • I recommend a clean restart after that to check everything is ok.
  • You’ll need to upgrade the usual things, e.g. XCode, any Text to Speech voices you have installed.
  • Homebrew requires a change of ownership for /usr/local/ – see discussion on Stack Exchange – to the best of my knowledge chown -R is perfectly safe, but you certainly shouldn’t start messing around disabling SIP.
  • SuperDuper – a program that does disk backups and cloning – requires you delete and recreate any existing scheduled backups, otherwise they won’t run.  More info
  • Expect to do one large Time Machine backup afterwards (again, this was smaller on the Macbook Air.)

Software compatibility:

  • I only had one program that was incompatible, a version of GPG (encryption).
  • If you still have Photoshop CS4, it needs the old version of Java. This is painless – on attempting to run it a Dialog Box informs you of this, the More Info button links to an Apple support page with a direct download to the file. You just install it and it works straight away.
  • No issues at all with PhpStorm (Jetbrains had display problems last year because of java bugs.)

Security:

Previously, Apple developed two-step authentication, with El Capitan they added two-factor authentication.  The former is still supported, the latter is more secure – “It uses different methods to trust devices and deliver verification codes” – but it requires first turning 2-step off, adding security questions (note your answers are max 32 characters) and then setting up 2-factor on an iOS device (which’ll discard the security questions you just created.)  Instructions (9to5mac)

Note that, given the current Apple/US government iPhone case, if you can’t get in with two-factor there is a recovery process (unlike if you lose your FileVault recovery key, say) but it’s not immediate.  The KB article refers to a confirmation email to your registered account, possibly being required to confirm credit card details etc.

How to turn off Fail2Ban email notifications

Updated 23 Mar 2016 with corrections.
(These instructions based on a CentOS machine I’m responsible for.)

You may find yourself getting multiple emails per day from a server running Fail2Ban, each and every time it blocks an IP address after several failed SSH logins, e.g.

Subject: [Fail2Ban] SSH: banned 123.123.123.123 from myserver

It’s not terribly obvious how to disable these – you’ll find plenty of threads from people asking how to turn Fail2Ban notifications on, not so many asking how to turn them off, also the concepts and syntax takes a bit of getting used to…

In /etc/fail2ban/jail.conf` there’s a section that describes various actions – look for action_, action_mw and action_mwl.  You’ll see they vary in scope, from just writing to the logfile to emailing the sysadmin (or even administrators identified in whois lookups) or automatically banning IPs from 3rd-party services like CloudFlare.

Further down is this:

# Choose default action.  To change, just override value of 'action' with the
# interpolation to the chosen action shortcut (e.g.  action_mw, action_mwl, etc) in jail.local
# globally (section [DEFAULT]) or per specific section
action = %(action_)s

In other words, you can have a single definition in /etc/fail2ban/jail.conf and reuse it in jail.local without writing it out again in full.  It will need to go in the correct [section] (or “jail”) or under [DEFAULT].

I’d recommend changing one thing at a time – many of the checks (FTP etc.) will be disabled by default anyway.

Note: your jail.local file may have the actions written out in full as well (mine did) in which case you can just manually remove the sendmail line.  Adding a duplicate action won’t produce a warning anywhere, fail2ban will just use the last one one.

But there’s no [ssh] section? Which of these “jails” do I use?

[ssh-iptables]
[ssh-tcpwrapper]
[ssh-route]
[ssh-iptables-ipset4]
[ssh-iptables-ipset6]
[ssh-iptables-ipset6]

Check fail2ban’s status to get a list of which jails it’s using, e.g.

sudo service fail2ban status
fail2ban-server (pid  9427) is running...
Status
|- Number of jail:    1
`- Jail list:    ssh-iptables

Your default jail.local will likely already have enabled=true or false lines for each jail too.

Remember to restart the service.

sudo service fail2ban restart

Checking what Fail2Ban doing now you no longer have email alerts

See the entries in /var/log/messages, such as:

Mar 21 13:41:54 myserver fail2ban.filter[3306]: INFO [ssh-iptables] Found 123.123.123.123
Mar 21 13:41:55 myserver fail2ban.filter[3306]: INFO [ssh-iptables] Found 
123.123.123.123
Mar 21 13:41:56 myserver fail2ban.filter[3306]: INFO [ssh-iptables] Found 123.123.123.123
Mar 21 13:41:57 myserver fail2ban.filter[3306]: INFO [ssh-iptables] Found 123.123.123.123
Mar 21 13:41:58 myserver fail2ban.filter[3306]: INFO [ssh-iptables] Found 123.123.123.123
Mar 21 13:41:59 myserver fail2ban.actions[3306]: NOTICE [ssh-iptables] Ban 123.123.123.123
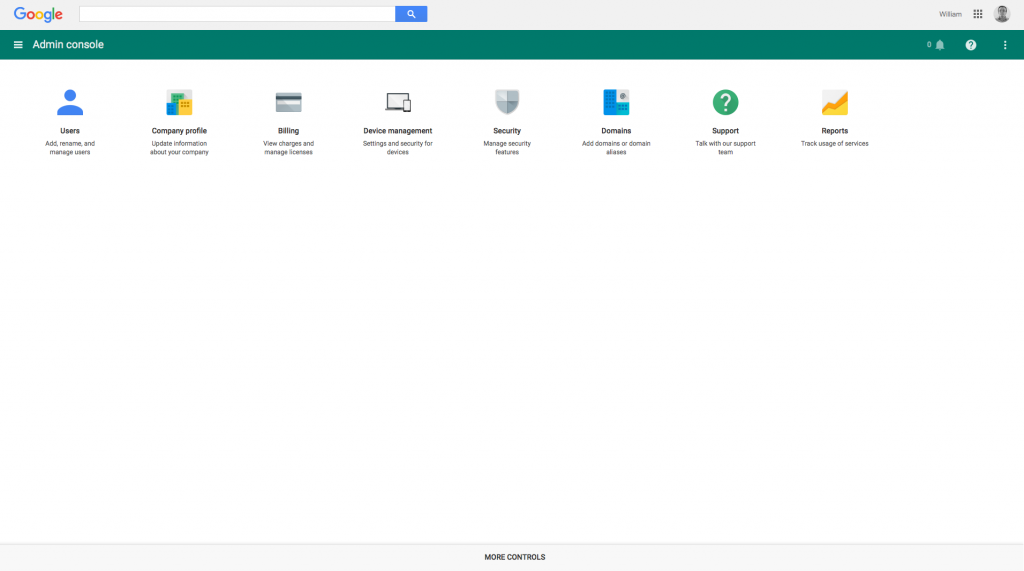
Missing Google Apps admin console menu items

…or how did anyone approve this design?

This graphic may help if you’re trying to setup a Gmail DKIM key using this instruction and having thoroughly searched all the icons, the handburger menu and the thing with 3-vertical dots on the right…

Sign into your Google Apps Admin console, then select Apps -> Google Apps -> Gmail -> Authenticate email

Here we are, all signed in. So where is Apps? (click to zoom in)

google-apps-menu-where-can-it-be

Give up?

Continue reading “Missing Google Apps admin console menu items”

Can’t get Exim4 to DKIM sign outgoing mail?

DKIM isn’t too hard to setup, but there’s a crucial typo in several tutorials –  including this otherwise excellent one for Debian – which may leave you scratching your head to as why the header with the signature is missing from  your outgoing emails (and with no error messages in Exim’s log.)

Wrong:

DKIM_FILE = /etc/exim4/dkim/example.com-private.pem

Right:

DKIM_PRIVATE_KEY = /etc/exim4/dkim/example.com-private.pem

If you look closely in the remote_smtp config, you’ll see which constants it reads in (dkim_private_key = DKIM_PRIVATE_KEY) – but it’s easy to miss.  Or to put it another way, the names of the constants used don’t matter, provided code elsewhere in the configuration files is looking for the matching definitions.

Other tips:

On Debian, when you run sudo update-exim4.conf, the output is written to /var/lib/exim4/config.autogenerated

If something’s not working, check your changes have been copied there.

You can have a situation where all the split config files (the directories under /etc/exim4/conf.d/) exist, but Exim is running in unsplit mode, so only /etc/exim4/exim4.conf.template will actually be read.  Run sudo dpkg-reconfigure exim4-config to fix this (or check the db_use_split_config line in /etc/exim4/update-exim4.conf.conf)

Fixing the MailChimp API SSL certificate

Here’s a StackOverflow answer by me for anyone who sees this error:

SSL certificate problem: unable to get local issuer certificate

…when using the MailChimp API.

The problem is due to MC using a root certificate that’s been removed from the Mozilla certificate bundle (you’re most likely to see it on Debian systems.)

This is a safer way to work around the problem that rolling all your certificates back to 2014 or disabling SSL certificate verification entirely.  You also won’t need to set cURL options or edit your php.ini.

Also covered: how to ‘ping’ the MailChimp API to check it’s working.